Have you ever wondered why your water might not taste as fresh as it should? It could be your water filter housing! This piece is essential in keeping your water clean and safe to drink.
But how do you make sure it’s working as it should? This article will guide you through maintaining and replacing your water filter housing. This way, you can always get the best quality water for you and your family.
So, if you’re ready to become a pro at handling your water filter, read on!
How to Replace Your Water Filter Housing?
Replacing a water filter housing can vary depending on the type of water filtration system you have. Here’s a general guide, but keep in mind that specific steps may differ based on your system:
Turn Off the Water Supply
Firstly, put a stop to your water supply. Usually, you can find the switch or knob near your water meter or where the water pipe enters your home. Turn it off by moving it clockwise.
Once you’ve done this, go to the sink and open the faucet. This is to let out any water still left in the pipes.
Release Pressure
Next, let’s decrease the pressure in your system. Look for the pressure release button on your filter housing. It’s often red or black. Push it, and you’ll hear a hiss. That sound means you’re doing it right!
Now, you’ve made working on your water filter housing safer. Less pressure means less chance for water to spray out when you open it.
Disconnect the Housing
Now, it’s time to disconnect the housing from your water system. Look for where your housing connects to the water pipes. You may need a wrench to help you unscrew it. Be careful not to twist too hard; an abrupt force may damage your system.
Once you’ve successfully disconnected the housing, it’s time for inspection. Check if there are any visible damages like cracks or leaks. If everything looks good, you can move on to the next step, replacing the filter.
Remove Old Filter
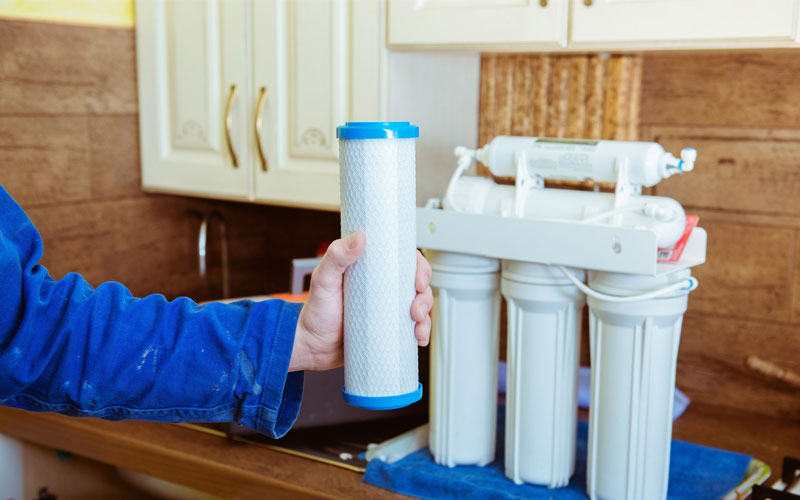
Now that your housing is disconnected removing the old filter is time. You might want a bucket or towel handy, as some leftover water might drip out. Carefully pull out the old filter and discard it properly.
With the old filter out of the way, it’s a good opportunity to clean the inside of your water filter housing. Use warm, soapy water and a soft cloth to clean the inside gently. This helps to remove any residue or build-up, ensuring your new filter can work at its best.
Apply Teflon Tape
Before installing the new filter, apply some Teflon tape to the threads of your filter housing. This step is crucial because it helps create a watertight seal and prevent leaks after installing the new filter.
Wrap the Teflon tape around the threads clockwise, following the direction of the threads. This ensures that the tape will not unravel when you screw the housing back onto your water system.
Install the New Filter
You’ve done well up to this point, and now it’s time to install the new filter. Take your shiny new filter and carefully place it into the housing. Ensure it fits snugly and the sealing surface is clean to ensure an effective seal.
With the new filter, you can reconnect the housing to your water system. Use your wrench to screw the housing with the new filter back onto your water system.
Attach the Housing
Moving on to the final step, it’s time to reattach the housing to your water system. Screw the water filter housing back onto the filtration system. Use a wrench to tighten it securely, but be cautious not to overtighten it, as it may cause damage.
When performing this step, remember that the longevity of your filtration system depends on the quality of its components. Considering this, you should get the best Filter Housing Systems available to ensure optimal performance and longevity.
How to Properly Maintain Your Water Filter Housing?
Water filter housing maintenance is essential to ensure that your filtration system functions effectively and provides clean and safe drinking water. Here are some general guidelines for properly maintaining your water filter housing:
Change Filters on Schedule
Adhering to the replacement schedule of your filters is crucial for the upkeep of your water filter housing and the quality of your drinking water. It’s generally recommended to replace your water filter every six months, but this can vary depending on the filter type and the water quality.
Cleaning Water Filter Housings
Keeping the housing clean is just as important as replacing your filters. Over time, dirt and other residues can build up in the housing, affecting the quality of your water and the performance of your filter. To clean it, remove the filter and gently scrub the housing with a soft brush in warm, soapy water.
Rinsing thoroughly after cleaning is vital to get rid of any soap residue. After rinsing, let the housing air dry completely before reinstalling the filter. This routine cleaning can help prolong the lifespan of your water filter housing and ensure the delivery of fresh, clean water.
Inspect O-rings and Seals
The O-rings and seals in your water filter housing prevent leaks. Checking their condition regularly can help you address potential issues before they lead to bigger problems.
Monitor Water Quality
Keeping an eye on your water quality is essential in maintaining your water filter housing. Changes in your water’s taste, smell, or color can indicate that it’s time to replace your filter or that there might be issues with the housing itself. Testing your water periodically is wise to ensure the filtration system is working effectively.
Maintain and Replace Your Filter Housing Right!
Keeping your water filter housing in top shape isn’t complicated, but it’s crucial for your health and water quality. By following these simple steps, you can ensure your water is always as pure as possible.
Remember, your water filter housing is your barrier against impurities, so treat it carefully. Enjoy the peace of mind of knowing your water is clean and safe. Drink up!
Was this article helpful to you? If so, make sure to check out our blog for more useful information and resources.

